Version control
Contents
3. Version control
Another set of tools that give us more control over our computational environment are tools that track changes in our software and analysis. If this seems like a boring or trivial task to you, consider the changes that you need to make to a program that you create to analyze your data, throughout a long project. Also, consider what happens when you work with others on the same project, and multiple different people can introduce changes to the code that you are using. If you have ever tried to do either of these things, you may have already invented your way to track changes to your programs. For example, naming the files with the date you made the most recent changes or adding the name of the author who made the most recent change to the filename. This is a form of version control – but it’s often idiosyncratic and error-prone. Instead, software tools for version control allow us to explicitly add a particular set of changes to the code that we are writing as we go along, keeping track for us of who made which changes and when. They also allow us to merge changes that other people are doing. If needed, it marks where changes we have made conflict with changes that others have made, and allows us to resolve these conflicts, before moving on
3.1. Getting started with git
One of the most widely-used software for version control is called “git”. Without going too much into the difference between git and other alternatives, we’ll just mention here that one of the reasons that git is very widely-used is because of the availability of services that allow you to use your version control to share your code with others through the web and to collaborate with them on the same code-base fairly seamlessly. A couple of the most popular services are GitHub and GitLab. After we introduce git and go over some of the basic mechanics of using git, we will demonstrate how you can use one of these services to collaborate with others and to share your code openly with anyone. This is an increasingly common practice and one that we will talk about more in Section 7.
Git is a command-line application. Like the ls, cd, and pwd unix commands
that you saw in Section 2, we use it in a shell application.
Installing git
First of all, verify whether you need to install git. If you already have a unix terminal to work with, you might already have git installed. In particular, if you installed git for windows as a way to get the unix shell in Section 2, you’re already set. Type git at the shell to check. If you get a long help document, this means that you have git installed. Otherwise, follow the instructions in the git online documentation to install the right version for your computer’s operating system.
In contrast to the other shell commands you saw before, git can do many
different things. To do that, git has sub-commands. For example, before
you start using git, you need to configure it to recognize who you are using the
git config sub-command. We need to tell git both our name and our email
address.
$ git config --global user.name "Ariel Rokem"
$ git config --global user.email arokem@gmail.com
This configuration step only needs to be done once on every computer on which
you use git, and is stored in your home directory (in a file called
~/.gitconfig).
3.1.1. Exercise
Download and install git and configure it with your name and email address.
The next sub-command that we will usually use with git is the one that you will start your work with from now on – the sub-command to initialize a repository. A repository is a folder within your filesystem that will be tracked as one unit. One way to think about that is that your different projects can be organized into different folders, and each one of them should probably be tracked separately. So, one project folder becomes one git repository (also often referred to as a “repo” for short). Before starting to use git, we then make a directory in which our project code will go.
$ mkdir my_project
$ cd my_project
The unix mkdir command creates a new directory called (in this case)
my_project and the cd command changes our working directory so that we are
now working within the new directory that we have created. And here comes the
first git sub-command, to initialize a repository:
$ git init
Initialized empty Git repository in /Users/arokem/projects/my_project/.git/
As you can see, when this sub-command is issued, git reports back that the empty repository has been created. We can start adding files to the repository by creating new files and telling git that these are files that we would like to track.
$ touch my_file.txt
$ git add my_file.txt
We’ve already seen the touch bash command before – it creates a new empty
file. Here, we’ve created a text file, but this can also be (more typically) a
file that contains a program written in some programming language. The git add
command tells git that this is a file that we would like to track – we would
like git to record any changes that we make in this file. A useful command that
we will issue early and often is the git status command. This command reports
to you about the current state of the repository that you are working in,
without making any changes to its content or state.
$ git status
On branch master

No commits yet

Changes to be committed:
(use "git rm --cached <file>..." to unstage)
   new file:   my_file.txt
Here it is telling us a few things about the repository and our work within it.
Let’s break this message down line by line. First of all, it tells us that we
are working on a branch called master. Branches are a very useful feature of
git. They can be thought of as different versions of the same repository that
you are storing side by side. The default when a repository is initialized is to
have only one branch called master. However, in recent years, git users have
raised objections to the use of this word to designate the default branch,
together with objections to other uses of “master”/”slave” designations in a
variety of computer science and engineering (e.g., in distributed computing, in
databases, etc.; to read more about this, see “Additional resources” at the end
of this section). Therefore, we will immediately change the name of the branch
to “main”.
$ git branch -M main
In general, it is a good practice to use not the default branch (now called
main), but a different branch for all of your new development work. The
benefit of this approach is that as you are working on your project, you can
always come back to a “clean” version of your work that is stored on your main
branch. It is only when you are sure that you are ready to incorporate some new
development work that you merge a new development branch into your main
branch. The next line in the status message tells us that we have not made any
commits to the history of this repository yet. Finally, the last three lines
tell us that there are changes that we could commit and make part of the history
of the repository. This is the new file that we just added, and is currently
stored in something called the “staging area”. This is a part of the repository
into which we have put files and changes that we might put into the history of
the repository next, but we can also “unstage” them so that they are not
included in the history. Either because we don’t want to include them yet, or
because we don’t want to include them at all. In parentheses git also gives us a
hint about how we might remove the file from the staging area – that is, how we
could “unstage” it. But for now, let’s assume that we do want to store the
addition of this file in the history of the repository and track additional
changes. Storing changes in the git repository is called making a commit, and
the next thing we do here is to issue the git commit command.
$ git commit -m "Adds a new file to the repository"
[main (root-commit) 1808a80] Adds a new file to the repository
1 file changed, 0 insertions(+), 0 deletions(-)
create mode 100644 my_file.txt
As you can see, the commit command uses the -m flag. The text in quotes
after this flag is the commit message. We are recording a history of changes
in the files that we are storing in our repository, and alongside the changes,
we are storing a log of these messages that give us a sense of who made these
changes, when they made them, and – stored in these commit messages – what the
intention of these changes was. Git also provides some additional information: a
new file was created; the mode of the file is 664, which is the mode for files
that can be read by anyone and written by the user (for more about file modes
and permissions, you can refer to the man page of the chmod unix command).
There were 0 lines inserted and 0 lines deleted because the file is empty and
doesn’t have any files yet.
We can revisit the history of the repository using the git log command.
$ git log
This should drop you into a new buffer within the shell that looks something like this:
commit 1808a8053803150c8a022b844a3257ae192f413c (HEAD -> main)
Author: Ariel Rokem <arokem@gmail.com>
Date:   Fri Dec 31 11:29:31 2021 -0800

   Adds a new file to the repository
It tells you who made the change (Ariel, in this case), how you might reach that
person (yes, that’s Ariel’s email address; git knows it because of the
configuration step we did when we first started using git) and when the change
was made (Almost noon on the last day of 2021, as it so happens). In the body of
that entry, you can see the message that we entered when we issued the git commit command. At the top of the entry, we also have a line that tells us that
this is the commit identified through a string of letters and numbers that
starts with “1808a”. This string is called the “SHA” of the commit, which stands
for “Simple Hashing Algorithm”. Git uses this clever algorithm to encode all of
the information that was included in the commit (in this case, the name of the
new file, and the fact that it is empty) and to encrypt this information into
the string of letters and numbers that you see. The advantage of this approach
is that this is an identifier that is unique within this repository because this
specific change can only be made once 1. This will allow us to look up
specific changes that were made within particular commits, and also allows us to
restore the repository, or parts of the repository, back to the state they had
when this commit was made. This is a particularly compelling aspect of version
control: you can effectively travel back in time to the day and time that you
made a particular change in your project and visit the code as it was on that
day and time. This also relates to the one last detail in this log message: next
to the SHA identifier, in parentheses is the message “(HEAD -> main)”. The
word “HEAD” always refers to the state of the repository in the commit that
you are currently viewing. Currently, HEAD – the current state of the
repository – is aligned with the state of the main branch, which is why it is
pointing to main. As we continue to work, we’ll be moving HEAD around to
different states of the repository. We’ll see the mechanics of that in a little
bit. But first, let’s leave this log buffer – by typing the q key.
Let’s check what git thinks of all this.
$ git status
On branch main
nothing to commit, working tree clean
We’re still on the main branch. But now git tells us that there is nothing to commit and that our working tree is clean. This is a way of saying that nothing has changed since the last time we made a commit. When using git for your own work, this is probably the state in which you would like to leave it at the end of a working session. To summarize so far: we haven’t done much yet, but we’ve initialized a repository, and added a file to it. Along the way, you’ve seen how to check the status of the repository, how to commit changes to the history of the repository, and how to examine the log that records the history of the repository. As you will see next, at the most basic level of operating with git, we go through cycles of changes and additions to the files in the repository and commits that record these changes, both operations that you have already seen. Overall, we will discuss three different levels of intricacy. The first level, which we will start discussing next, is about tracking changes that you make to a repository and using the history of the repository to recover different states of your project. At the second level, we will dive a little bit more into the use of branches to make changes and incorporate them into your project’s main branch. The third level is about collaborating with others on a project.
3.2. Working with git at the first level: tracking changes that you make
Continuing the project we started above, we might make some edits to the file
that we added. The file that we created,my_file.txt, is a text file and we can
open it for editing in many different applications (we discuss text editors –
used to edit code – in Section 6). We can also use the unix echo
command to add some text to the file from the command line.
$ echo "a first line of text" >> my_file.txt
Here, the >> operator is used to redirect the output of the echo command –
you can check what it does by reading the man page – into our text file. Note
that there are two > symbols in that command, which indicates that we would
like to concatenate the string of characters to the end of the file. If we used
only one, we would overwrite the contents of the file entirely. For now, that’s
not too important because there wasn’t anything in the file, to begin with, but
it will be important in what follows.
We’ve made some changes to the file. Let’s see what git says.
$ git status
On branch main
Changes not staged for commit:
(use "git add <file>..." to update what will be committed)
(use "git restore <file>..." to discard changes in working directory)
   modified:   my_file.txt

no changes added to commit (use "git add" and/or "git commit -a")
Let’s break that down again. We’re still on the main branch. But we now have
some changes in the file, which are indicated by the fact that there are changes
not staged for a commit in our text file. Git provides two hints, in
parentheses, as to different things we might do next, either to move these
changes into the staging area or to discard these changes and return to the
state of affairs as it was when we made our previous commit.
Let’s assume that we’d like to retain these changes. That means that we’d like
to first move these changes into the staging area. This is done using the
git add sub-command.
$ git add my_file.txt
Let’s see how this changes the message that git status produces.
$ git status
On branch main
Changes to be committed:
(use "git restore --staged <file>..." to unstage)
   modified:   my_file.txt
The file in question has moved from “changes not staged for commit” to “changes to be committed”. That is, it has been moved into the staging area. As suggested in the parentheses, it can be unstaged, or we can continue as we did before and commit these changes.
$ git commit -m"Adds text to the file"
[main 42bab79] Adds text to the file
1 file changed, 1 insertion(+)
Again, git provides some information: the branch into which this commit was
added (main) and the fact that one file changed, with one line of insertion.
We can look at the log again to see what has been recorded:
$ git log
Which should look something like the following, with the most recent commit at the top.
commit 42bab7959c3d3c0bce9f753abf76e097bab0d4a8 (HEAD -> main)
Author: Ariel Rokem <arokem@gmail.com>
Date:   Fri Dec 31 20:00:05 2021 -0800

   Adds text to the file

commit 1808a8053803150c8a022b844a3257ae192f413c
Author: Ariel Rokem <arokem@gmail.com>
Date:   Fri Dec 31 11:29:31 2021 -0800

   Adds a new file to the repository
Again, we can move out of this buffer by pressing the q key. We can also check
the status of things again, confirming that there are no more changes to be
recorded.
$ git status
On branch main
nothing to commit, working tree clean
This is the basic cycle of using git: make changes to the files, use git add
to add them to the staging area, and then git commit` to add the staged changes
to the history of the project, with a record made in the log. Let’s do this one
more time, and see a couple more things that you can do along the way, as you
are making changes. For example, let’s add another line of text to that file.
$ echo "another line of text" >> my_file.txt
We can continue in the cycle, with a git add and then git commit right here,
but let’s pause to introduce one more thing that git can do, which is to tell
you exactly what has changed in your repository since your last commit. This is
done using the git diff command. If you issue that command:
$ git diff
you should be again dropped into a different buffer that looks something like this:
diff --git a/my_file.txt b/my_file.txt
index 2de149c..a344dc0 100644
--- a/my_file.txt
+++ b/my_file.txt
@@ -1 +1,2 @@
a first line of text
+another line of text
This buffer contains the information that tells you about the changes in the
repository. The first few lines of this information tell you a bit about where
these changes occurred and the nature of these changes. The last two lines tell
you exactly the content of these changes: the addition of one line of text
(indicated by a “+” sign). If you had already added other files to the
repository and made changes across multiple different files (this is pretty
typical as your project grows and the changes that you introduce during your
work become more complex), different “chunks” that indicate changes in a
different file, would be delineated by headers that look like the fifth line in
this output, starting with the “@@” symbols. It is not necessary to run git diff if you know exactly what changes you are staging and committing, but it
provides a beneficial look into these changes in cases where the changes are
complex. In particular, examining the output of git diff can give you a hint
about what you might write in your commit message. This would be a good point to
make a slight aside about these messages and to try to impress upon you that it
is a great idea to write commit messages that are clear and informative. This is
because as your project changes and the log of your repository grows longer,
these messages will serve you (and your collaborators, if more than one person
is working with you on the same repository, we’ll get to that in a little bit)
as guide-posts to find particular sets of changes that you made along the way.
Think of these as messages that you are sending right now, with your memory of
the changes you made to the project fresh in your mind, to yourself six months
from now, when you will no longer remember exactly what changes you made and
why.
At any rate, committing these changes can now look as simple as:
$ git add my_file.txt
$ git commit -m"Adds a second line of text"
Which would now increase your log to three different entries:
commit f1befd701b2fc09a52005156b333eac79a826a07 (HEAD -> main)
Author: Ariel Rokem <arokem@gmail.com>
Date:   Fri Dec 31 20:26:24 2021 -0800

   Adds a second line of text

commit 42bab7959c3d3c0bce9f753abf76e097bab0d4a8
Author: Ariel Rokem <arokem@gmail.com>
Date:   Fri Dec 31 20:00:05 2021 -0800

   Adds text to the file

commit 1808a8053803150c8a022b844a3257ae192f413c
Author: Ariel Rokem <arokem@gmail.com>
Date:   Fri Dec 31 11:29:31 2021 -0800

   Adds a new file to the repository
As you have already seen, this log serves as a record of the changes you made to
files in your project. In addition, it can also serve as an entry point to
undoing these changes or to see the state of the files as they were at a
particular point in time. For example, let’s say that you would like to go back
to the state that the file had before the addition of the second line of text to
that file. To do so, you would use the SHA identifier of the commit that
precedes that change and the git checkout command.
$ git checkout 42bab my_file.txt
Updated 1 path from f9c56a9
Now, you can open the my_file.txt file and see that the contents of this file
have been changed to remove the second line of text. Notice also that we didn’t
have to type the entire 40-character SHA identifier. That is because the five
first characters uniquely identify this commit within this repository and git
can find that commit with just that information. To re-apply the change, you can
use the same checkout command, but use the SHA of the later commit instead.
$ git checkout f1bef my_file.txt
Updated 1 path from e798023
One way to think of the checkout command is that as you are working on your
project git is creating a big library that contains all of the different
possible states of your filesystem. When you want to change your filesystem to
match one of these other states, you can go to this library and check it out
from there. Another way to think about this is that we are pointing HEAD to
different commits and thereby changing the state of the filesystem. This
capability becomes increasingly useful when we combine it with the use of
branches, which we will see next.
3.3. Working with git at the second level: branching and merging
As we mentioned before, branches are different states of your project that can
exist side by side. One of the dilemmas that we face when we are working on data
analysis projects for a duration of time is that we would like to be able to
rapidly make experiments and changes to the code, but we often also want to be
able to switch over to a state of the code that “just works”. This is exactly
the way that branches work: Using branches allows you to make rapid changes to
your project without having to worry that you will not be able to easily recover
a more stable state of the project. Let’s see this in action in the minimal
project that we started working with. To create a new branch, we use the git branch command. To start working on this branch we check it out from the
repository (the library) using the git checkout command.
$ git branch feature_x
$ git checkout feature_x
$ echo "this is a line with feature x" >> my_file.txt
$ git add my_file.txt
$ git commit -m"Adds feature x to the file"
Examining the git log you will see that there is an additional entry in the
history. For brevity, we show here just the two top (most recent) entries, but
the other entries will also be in the log (remember that you can leave the log
buffer by pressing the q key).
commit ab2c28e5c08ca80c9d9fa2abab5d7501147851e1 (HEAD -> feature_x)
Author: Ariel Rokem <arokem@gmail.com>
Date:   Sat Jan 1 13:27:48 2022 -0800

   Adds feature x to the file

commit f1befd701b2fc09a52005156b333eac79a826a07 (main)
Author: Ariel Rokem <arokem@gmail.com>
Date:   Fri Dec 31 20:26:24 2021 -0800

   Adds a second line of text
You can also see that HEAD – the current state of the repository – is
pointing to the feature_x branch. We also include the second entry in the log,
so that you can see that the main branch is still in the state that it was
before. We can further verify that by checking out the main branch.
$ git checkout main
If you open the file now, you will see that the feature x line is nowhere to be
seen and if you look at the log, you will see that this entry is not in the log
for this branch and that HEAD is now pointing to main. But – and this is
part of what makes branches so useful – it is very easy to switch back and
forth between any two branches. Another git checkout feature_x would bring
HEAD back to the feature_x branch and adds back that additional line to the
file. In each of these branches, you can continue to make changes and commit
these changes, without affecting the other branch. The history of the two
branches has forked in two different directions. Eventually, if the changes that
you made on the feature_x branch are useful, you will want to combine the
history of these two branches. This is done using the git merge command, which
asks git to bring all of the commits from one branch into the history of another
branch. The syntax of this command assumes that HEAD is pointing to the
branch into which you would like to merge the changes, so if we are merging
feature_x into main we would issue one more git checkout main before
issuing the merge command.
$ git checkout main
$ git merge feature_x
Updating f1befd7..ab2c28e
Fast-forward
my_file.txt | 1 +
1 file changed, 1 insertion(+)
The message from git indicates to us that the main branch has been updated
– it has been “fast-forwarded”. It also tells us that this update pulled in
changes in one file, with the addition of one line of insertion.
A call to git log will show us that the most recent commit (the one
introducing the “feature x” line) is now in the history of the main branch
and HEAD is pointing to both main and feature_x.
commit ab2c28e5c08ca80c9d9fa2abab5d7501147851e1 (HEAD -> main, feature_x)
Author: Ariel Rokem <arokem@gmail.com>
Date:   Sat Jan 1 13:27:48 2022 -0800

   Adds feature x to the file
This is possible because both of these branches now have the same history. If
we’d like to continue working, we can remove the feature_x branch and keep
going.
$ git branch -d feature_x
Using branches in this way allows you to rapidly make changes to your projects,
while always being sure that you can switch the state of the repository back to
a known working state. We recommend that you keep your main branch in this
known working state and only merge changes from other branches when these
changes have matured sufficiently. One way that is commonly used to determine
whether a branch is ready to be merged into main is by asking a collaborator
to look over these changes and review them in detail. This brings us to the most
elaborate level of using git – in collaboration with others.
3.4. Working with git at the third level: collaborating with others
So far, we’ve seen how git can be used to track your work on a project. This is certainly useful when you do it on your own, but git really starts to shine when you put it to work to track the work of more than one person on the same project. For you to be able to collaborate with others on a git-tracked project, you will need to put the git repository somewhere where different computers can access it. This is called a “remote”, because it is a copy of the repository that is on another computer, usually located somewhere remote from your computer. Git supports many different modes of setting up remotes, but we will only show one here, using the GitHub website as the remote.
To get started working with GitHub, you will need to set up a (free) account. If you are a student or instructor at an educational institution, we recommend that you look into the various educational benefits that are available to you through GitHub Education.
Once you have set up your user account on GitHub, you should be able to create a new repository by clicking on the “+” sign on the top right of the web page and selecting “new repository” (see Fig. 6.1).
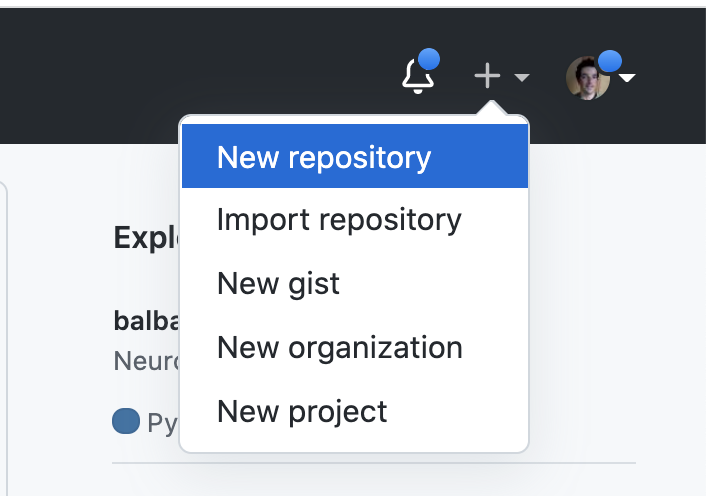
Fig. 3.1 Creating a new repository through the GitHub web interface.
On the following page (Fig. 3.2), you will be asked to name your repository. GitHub is a publicly available website, but you can choose whether you would like to make your code publicly viewable (by anyone!) or only viewable by yourself and by collaborators that you will designate. You will also be given a few other options, such as an option to add a README file and to add a license. We’ll come back to these options and their implications when we talk about sharing data analysis code in Section 7).
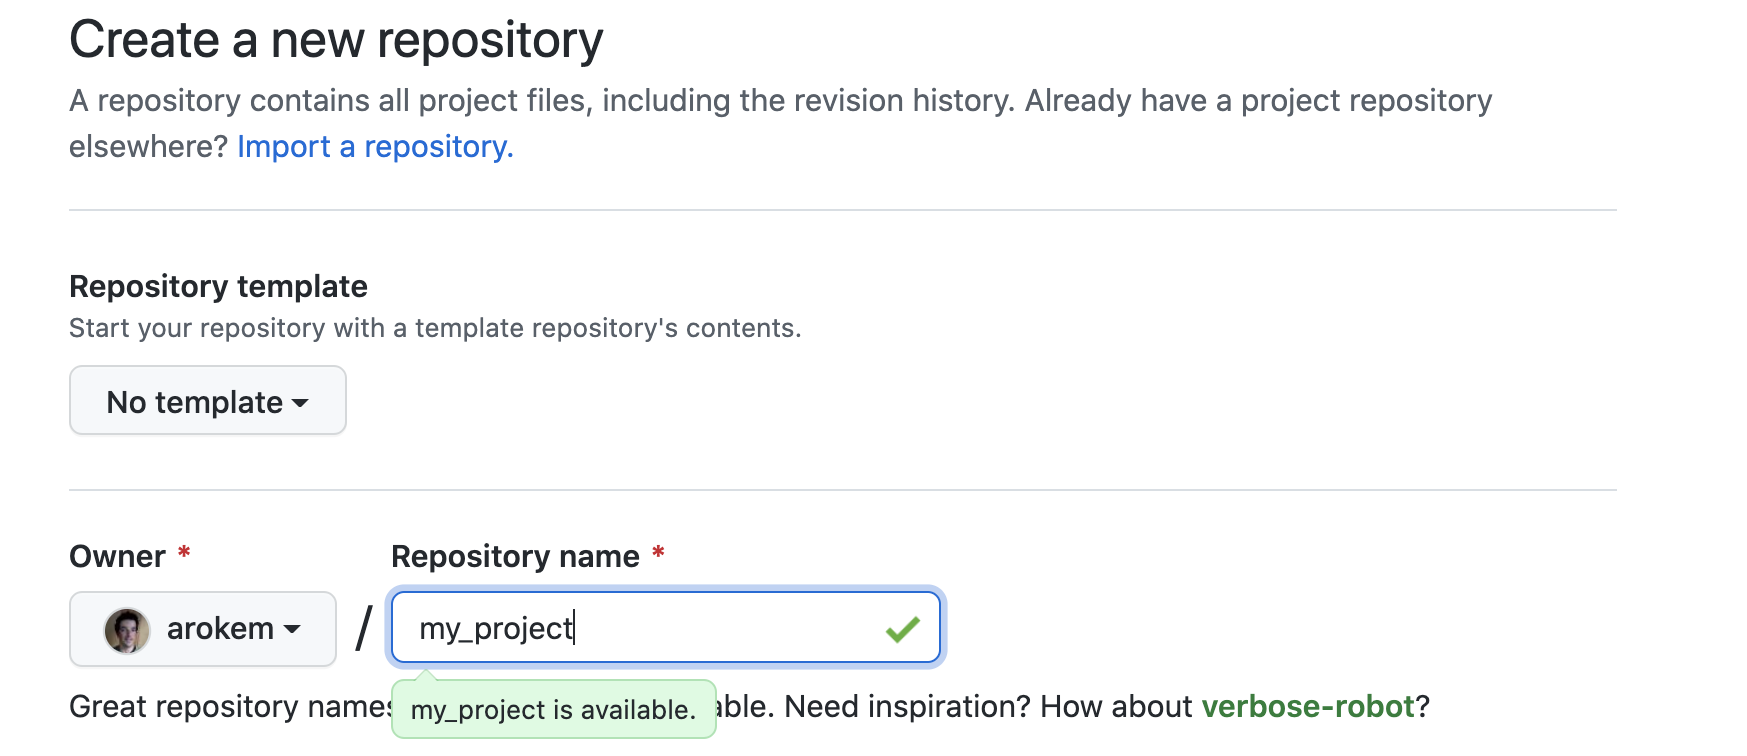
Fig. 3.2 Initializing a GitHub repository by giving it a name.
The newly-created web page will be the landing page for your repository on the
internet. It will have a URL that will look something like:
https://github.com/<user name>/<project name>. For example, since we created
this repository under Ariel’s GitHub account, it now has the URL
https://github.com/arokem/my_project (feel free to visit that URL. It has been
designated as publicly viewable). But there is nothing there until we tell git
to transfer over the files from our local copy of the repository on our machine
into a copy on the remote – the GitHub webpage. When a GitHub repository is
empty, the front page of the repository contains instructions for adding code to
it, either by creating a new repository on the command line or from an existing
repository. We will do the latter here because we already have a repository
that we have started working on. The instructions for this case are entered in
the command line with the shell set to have its working directory in the
directory that stores our repository.
$ git remote add origin https://github.com/arokem/my_project.git
$ git branch -M main
$ git push -u origin main
The first line of these uses the git remote sub-command, which manages
remotes, and the sub-sub-command git remote add to add a new remote called
origin. We could name it anything we want (for example git remote add github
or git remote add arokem), but it is a convention to use origin (or
sometimes also upstream) as the name of the remote that serves as the central
node for collaboration. It also tells git that this remote exists at that URL
(notice the addition of .git to the URL). Addmitedly, it’s a long command with
many parts.
The next line is something that we already did when we first initialized this
repository – changing the name of the default branch to main. So, we can skip
that now.
The third line uses the git push sub-command to copy the repository – the
files stored in it and its entire history – to the remote. We are telling git
that we would like to copy the main branch from our computer to the remote
that we have named origin. The -u flag tells git that this is going to be
our default for git push from now on, so whenever we’d like to push again from
main to origin, we will only have to type git push from now on, and not
the entire long version of this incantation (git push origin main).
Importantly, though you should have created a password when you created your GitHub account, GitHub does not support authentication with a password from the command line. This makes GitHub repositories very secure, but it also means that when you are asked to authenticate to push your repository to GitHub, you will need to take a different route. There are two ways to go about this. The first is to create a personal access token (PAT). The GitHub documentation has a webpage that describes this process. Instead of typing the GitHub password that you created when you created your account, copy this token (typically, a long string of letters, numbers, and other characters) into the shell when prompted for a password. This should look as follows.
$ git push -u origin main
Username for 'https://github.com': arokem
Password for 'https://arokem@github.com':<insert your token here>
Enumerating objects: 12, done.
Counting objects: 100% (12/12), done.
Delta compression using up to 8 threads
Compressing objects: 100% (5/5), done.
Writing objects: 100% (12/12), 995 bytes | 497.00 KiB/s, done.
Total 12 (delta 0), reused 0 (delta 0), pack-reused 0
To https://github.com/arokem/my_project.git
* [new branch]      main -> main
Branch 'main' set up to track remote branch 'main' from 'origin'.
Another option is to use SSH keys for authentication. This is also described
in the GitHub documentation. The first step is to create the key and store
it on your computer, described here. The second step is to
let GitHub know about this SSH key, as described here. The
benefit of using an SSH key is that we do not need to generate it anew every
time that we want to authenticate from this computer. Importantly, if we
choose the SSH key route for authenticating, we need to change the URL that we
use to refer to the remote. This is done through another sub-command of the
git remote command:
$ git remote set-url origin git@github.com:arokem/my_project.git
Once we have done that, we can visit the webpage of the repository again and see that the files in the project and the history of the project have now been copied into that website (Fig. 3.3). Even if you are working on a project on your own this serves as a remote backup, and that is already quite useful to have, but we are now also ready to start collaborating. This is done by clicking on the “settings” tab at the top right part of the repository page, selecting the “manage access” menu item, and then clicking on the “add people” button (Fig. 3.4). This will let you select other GitHub users, or enter the email address for your collaborator (Fig. 3.5). As another security measure, after they are added as a collaborator, this other person will have to receive an email from GitHub and approve that they would like to be designated as a collaborator on this repository, by clicking on a link in the email that they received.
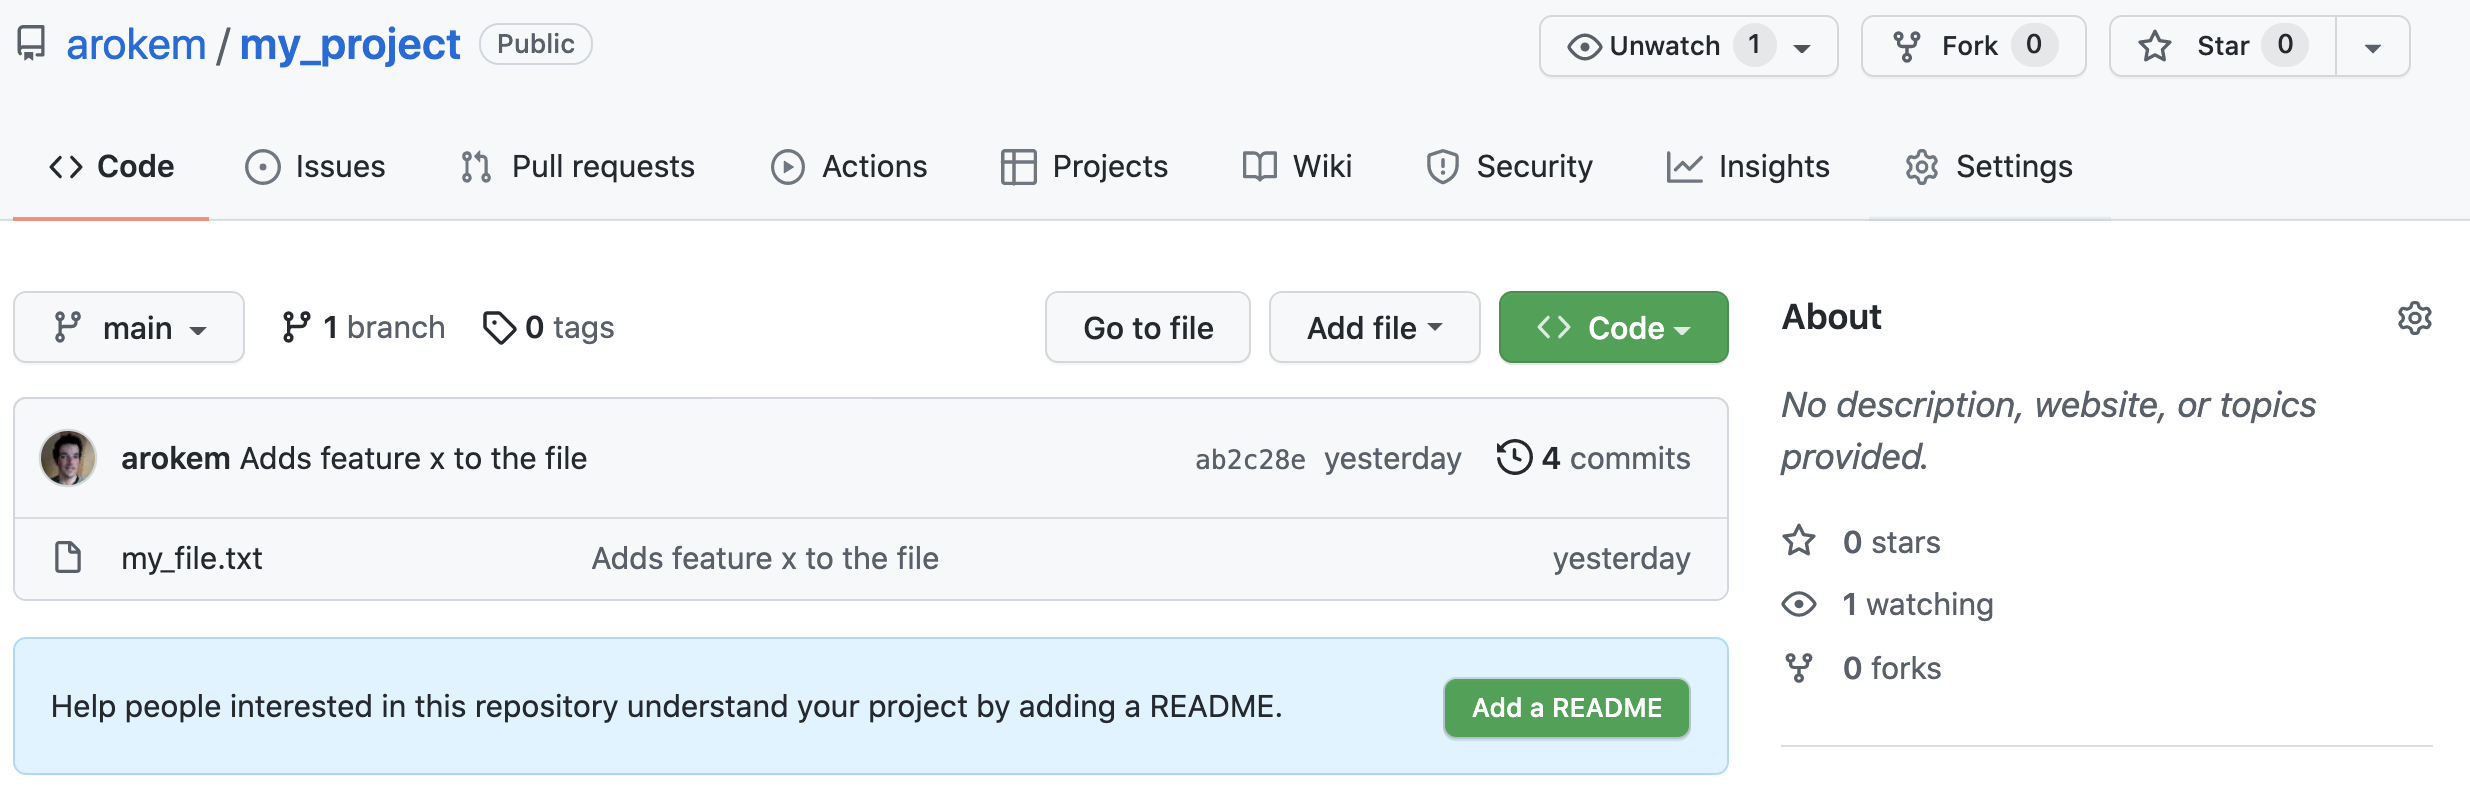
Fig. 3.3 A copy of the files and history of the project in the GitHub repo.
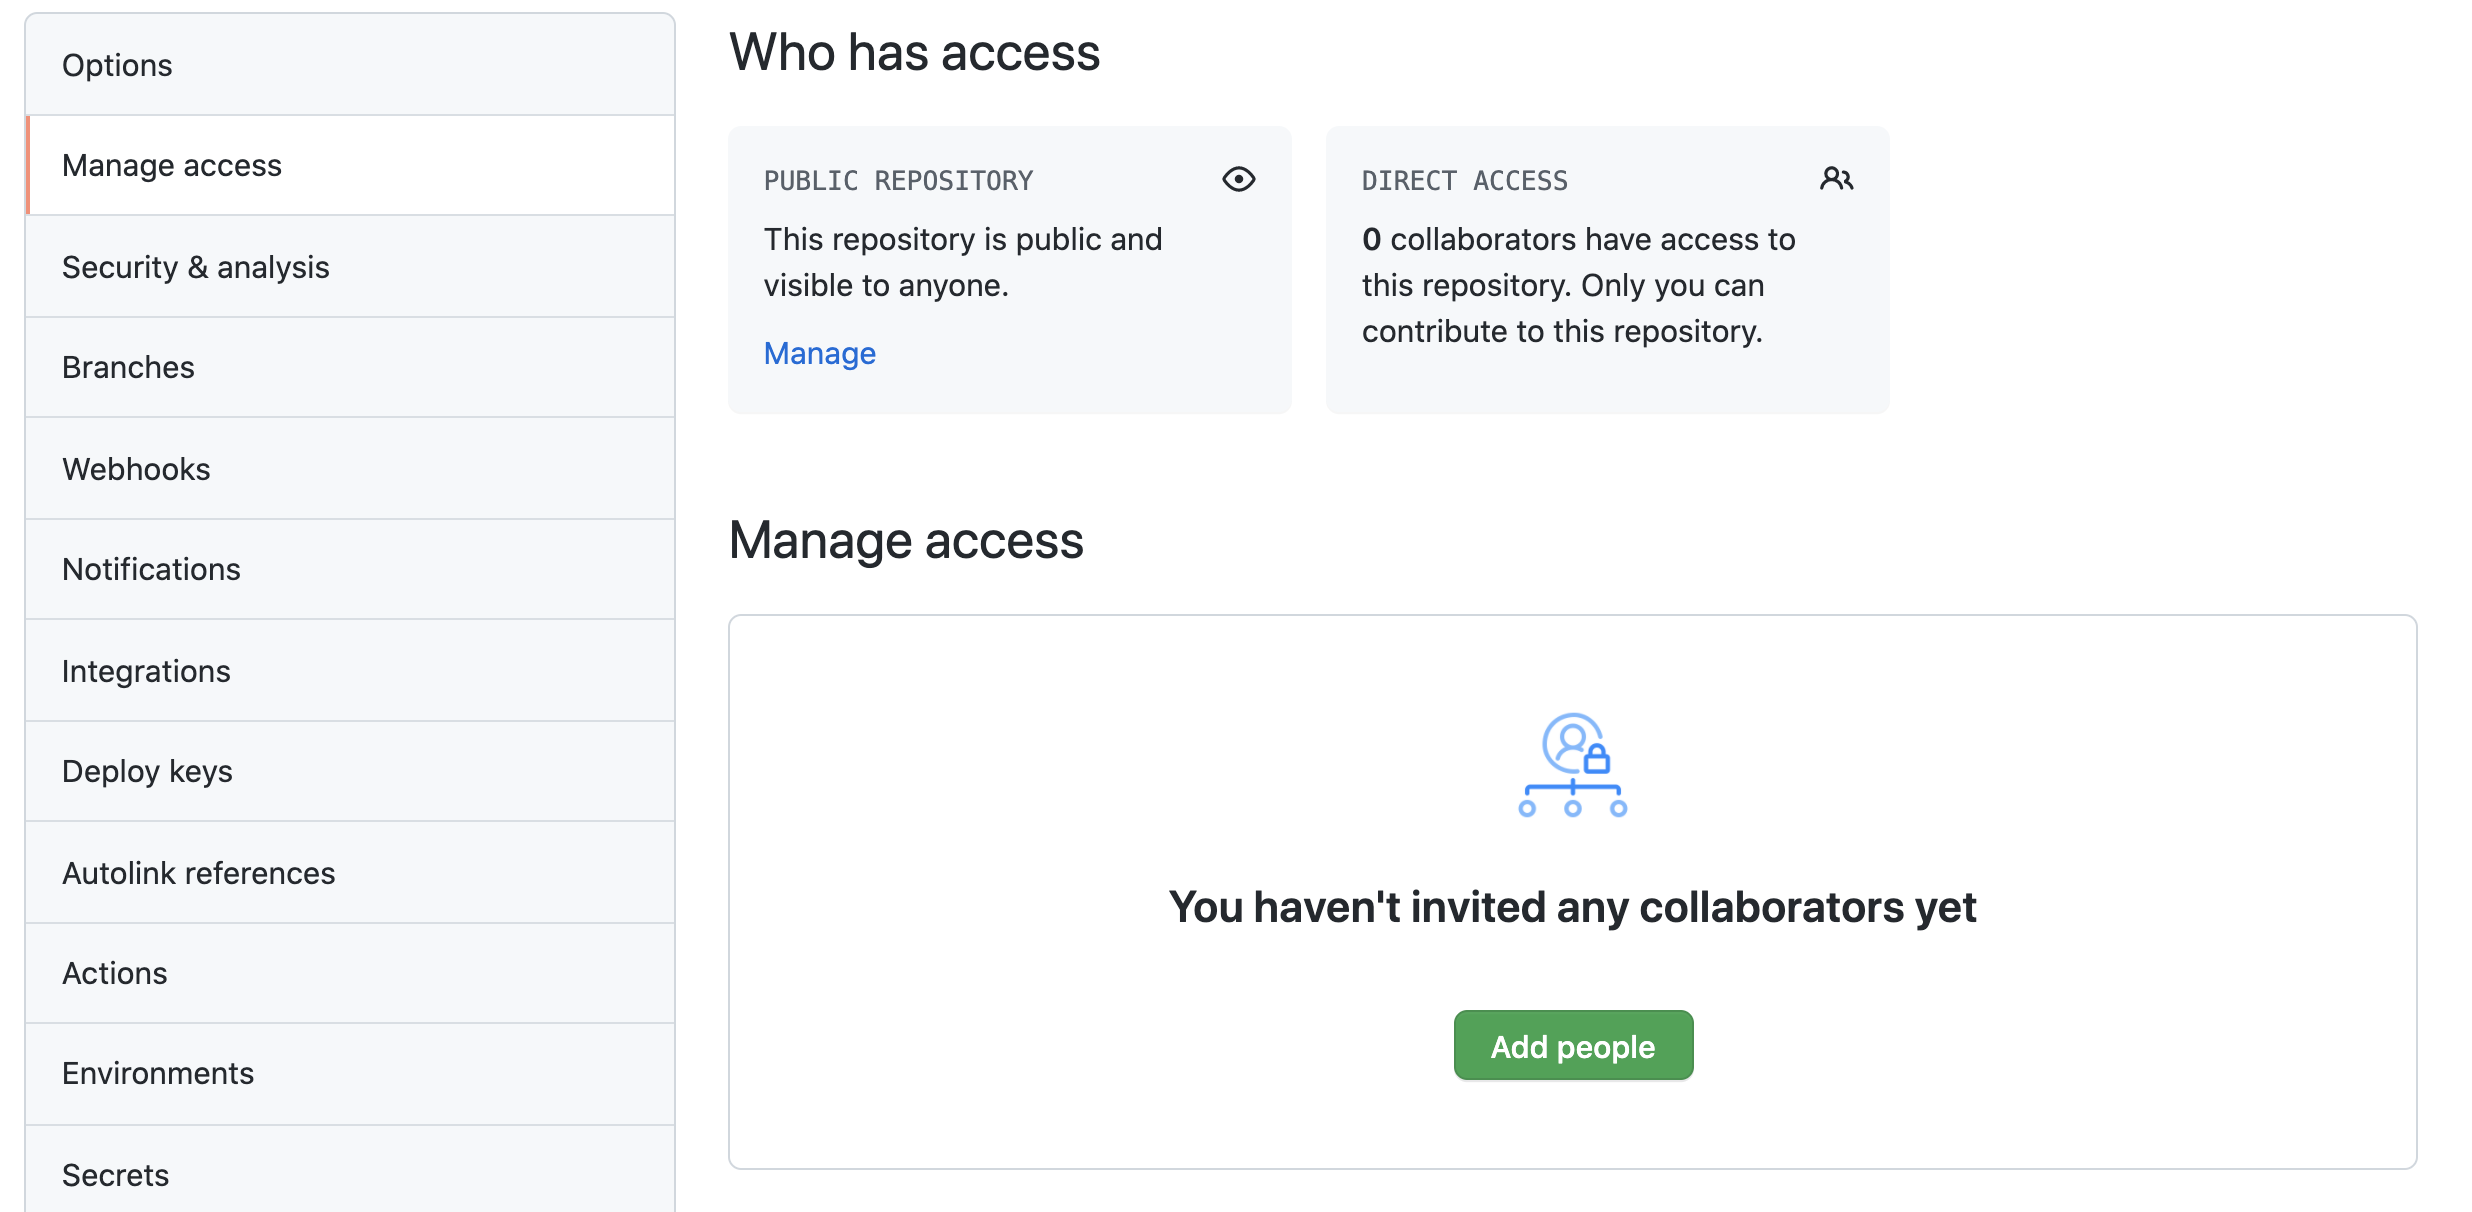
Fig. 3.4 Click the green “Add people” button to add collaborators.
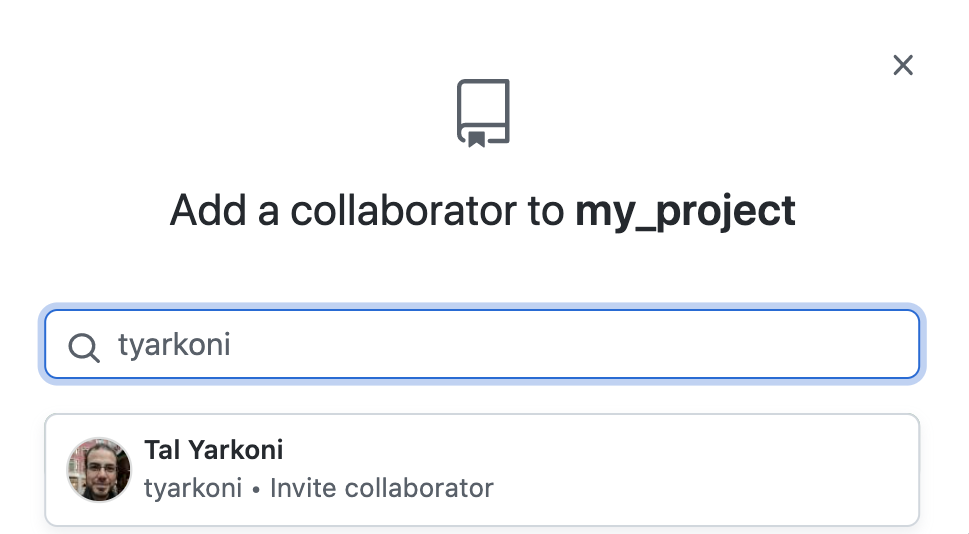
Fig. 3.5 Entering the GitHub user-name of a collaborator will let you select them from a drop-down.
Once they approve the request to join this GitHub repository as a collaborator,
this other person can then both git push to your repository, just as we
demonstrated above, as well as git pull from this repository, which we will
elaborate on below. The first step they will need to take, however, is to git clone the repository. This would look something like this:
$ git clone https://github.com/arokem/my_project.git
When this is executed inside of a particular working directory (for example,
~/projects/), this will create a sub-directory called my_project
(~/projects/my_project; note that you can’t do that in the same directory that
already has a my_project folder in it, so if you are following along, issue
this git clone command in another part of your file-system) that contains all
of the files that were pushed to GitHub. In addition, this directory is a full
copy of the git repository, meaning that it also contains the entire history of
the project. All of the operations that we did with the local copy on our own
repository (for example, checking out a file using a particular commit’s SHA
identifier) are now possible on this new copy.
The simplest mode of collaboration is one where a single person makes all of the
changes to the files. This person is the only person who issues git push
commands, which update the copy of the repository on GitHub and then all the
other collaborators issue git pull origin main within their local copies, to
update the files that they have on their machines. The git pull command is the
opposite of the git push command that you saw before, syncing the local copy
of the repository to the copy that is stored in a particular remote (in this
case, the GitHub copy is automatically designated as origin when git clone
is issued).
A more typical mode of collaboration is one where different collaborators are all both pulling changes that other collaborators made, as well as pushing their changes. This could work, but if you are working on the same repository at the same time, you might run into some issues. The first arises when someone else pushed to the repository during the time that you were working and the history of the repository on GitHub is out of sync with the history of your local copy of the repository. In that case, you might see a message such as this one:
$ git push origin main
To https://github.com/arokem/my_project.git
! [rejected]        main -> main (fetch first)
error: failed to push some refs to 'https://github.com/arokem/my_project.git'
hint: Updates were rejected because the remote contains work that you do
hint: not have locally. This is usually caused by another repository pushing
hint: to the same ref. You may want to first integrate the remote changes
hint: (e.g., 'git pull ...') before pushing again.
hint: See the 'Note about fast-forwards' in 'git push --help' for details.```
Often, it would be enough to issue a git pull origin main, followed by a git push origin main (as suggested in the hint) and this issue would be resolved –
your collaborator’s changes would be integrated into the history of the
repository together with your changes, and you would happily continue working.
But in some cases, if you and your collaborator introduced changes to the same
lines in the same files, git would not know how to resolve this conflict, and
you would then see a message that looks like this:
$ git pull origin main
remote: Enumerating objects: 5, done.
remote: Counting objects: 100% (5/5), done.
remote: Compressing objects: 100% (2/2), done.
remote: Total 3 (delta 0), reused 3 (delta 0), pack-reused 0
Unpacking objects: 100% (3/3), 312 bytes | 78.00 KiB/s, done.
From https://github.com/arokem/my_project
* branch            main       -> FETCH_HEAD
   ab2c28e..9670d72  main       -> origin/main
Auto-merging my_file.txt
CONFLICT (content): Merge conflict in my_file.txt
Automatic merge failed; fix conflicts and then commit the result.
This means that there is a conflict between the changes that were introduced by your collaborator and the changes that you introduced. There is no way for git to automatically resolve this kind of situation because it can’t tell which of the two conflicting versions should be selected. Instead, git edits the file to add conflict markers. That is, if you open the text file in a text editor, it would now look something like this:
a first line of text
another line of text
this is a line with feature x
<<<<<<< HEAD
an addition you made
=======
addition made by a collaborator
>>>>>>> 9670d72897a5e15defb257010f928bd22f54c929
Everything up to the third line of the file is changes that both of you had in
your history. After that, your changes to the file diverge. At the same time
that you added the line of text “an addition you made”, the collaborator added
the line “addition made by a collaborator”. To highlight the source of the
conflict, git introduced the markers you see in the text snippet above. The
“<<<<<<< HEAD” marker starts the part of the file that was in HEAD on your
local copy. Everything below the “=======” marker, until the “>>>>>>> 9670d72…” comes from the collaborator. The SHA identifier at the end of this
marker is also the identifier of the commit that the collaborator made to the
repository while you were making your changes.
In addition, if you issue a git status command at this point, you will see
the following:
$ git status
On branch main
Your branch and 'origin/main' have diverged,
and have 1 and 1 different commits each, respectively.
(use "git pull" to merge the remote branch into yours)

You have unmerged paths.
(fix conflicts and run "git commit")
(use "git merge --abort" to abort the merge)

Unmerged paths:
(use "git add <file>..." to mark resolution)
   both modified:   my_file.txt

no changes added to commit (use "git add" and/or "git commit -a")
Regardless of whether you would like to include your changes, as well as the
changes from your collaborator, or just one of these change sets, your next step
is to edit the files where conflicts exist to end up with the content that you
would want them to have going forward. This would include removing the conflict
markers that git introduced along the way. To resolve the conflict, you might
also need to talk to your collaborator, to understand why you both made
conflicting changes to the same lines. At the end of this process, you would
make one more git commit, followed by a git push, and keep working from this
new state. Your collaborators should be able to issue a git pull in their copy
of the repository to get the conflict resolved on their end as well.
Another slightly more elaborate pattern of collaboration would involve the use
of branches. Remember that we mentioned that maybe it would be a good idea to
work only on branches other than main? One reason for that is that this allows
you to go through a process of review of new changes before they get integrated
into the main branch. GitHub facilitates this process through an interface
called a “pull request”. The process works as follows: whenever you would like
to make a change to the project, you create a new branch from main and implement
the change on this branch. For example:
$ git branch feature_y
$ git checkout feature_y
$ echo "this is a line with feature y" >> my_file.txt
Then, we add the file to the staging area, commit this change in this branch, and push the branch to GitHub:
$ git add my_file.txt
$ git commit -m"Implements feature y"
[feature_y 948ea1d] Implements feature y
1 file changed, 1 insertion(+)
$ git push origin feature_y
Enumerating objects: 5, done.
Counting objects: 100% (5/5), done.
Delta compression using up to 8 threads
Compressing objects: 100% (2/2), done.
Writing objects: 100% (3/3), 283 bytes | 283.00 KiB/s, done.
Total 3 (delta 1), reused 0 (delta 0), pack-reused 0
remote: Resolving deltas: 100% (1/1), completed with 1 local object.
remote:
remote: Create a pull request for 'feature_y' on GitHub by visiting:
remote:      https://github.com/arokem/my_project/pull/new/feature_y
remote:
To https://github.com/arokem/my_project.git
* [new branch]      feature_y -> feature_y
As you can see in the message emitted by git, a new branch has been created and
we can visit the GitHub repository at the URL provided to create a pull request.
The page that opens when you visit this URL already includes the commit message
that we used to describe. It also has a text box into which we can type more
details about the change (Fig. 3.6). Once we hit the “Create pull
request” button, we are taken to a separate page that serves as a forum for
discussion of these changes (Fig. 3.7). At the same time, all of the
collaborators on the repository receive an email that alerts them that a pull
request has been created. By clicking on the “Files changed” tab on this page,
collaborators can see a detailed view of all of the changes introduced to the
code (Fig. 3.8). They can comment on the changes through the web
interface and discuss any further changes that need to be made for this
contribution to be merged into main. The original author of the branch that
led to this pull request can continue working on the branch, based on these
comments, making further commits. When consensus is reached, one of the
collaborators on the repository can click the “Merge pull request” button
(Fig. 3.6). This triggers the sending of another email to all of the
collaborators on this repository, alerting them that the main branch has
changed and that they should issue a git pull origin main on their local
copies of the repository to sync their main branch with the GitHub repository.
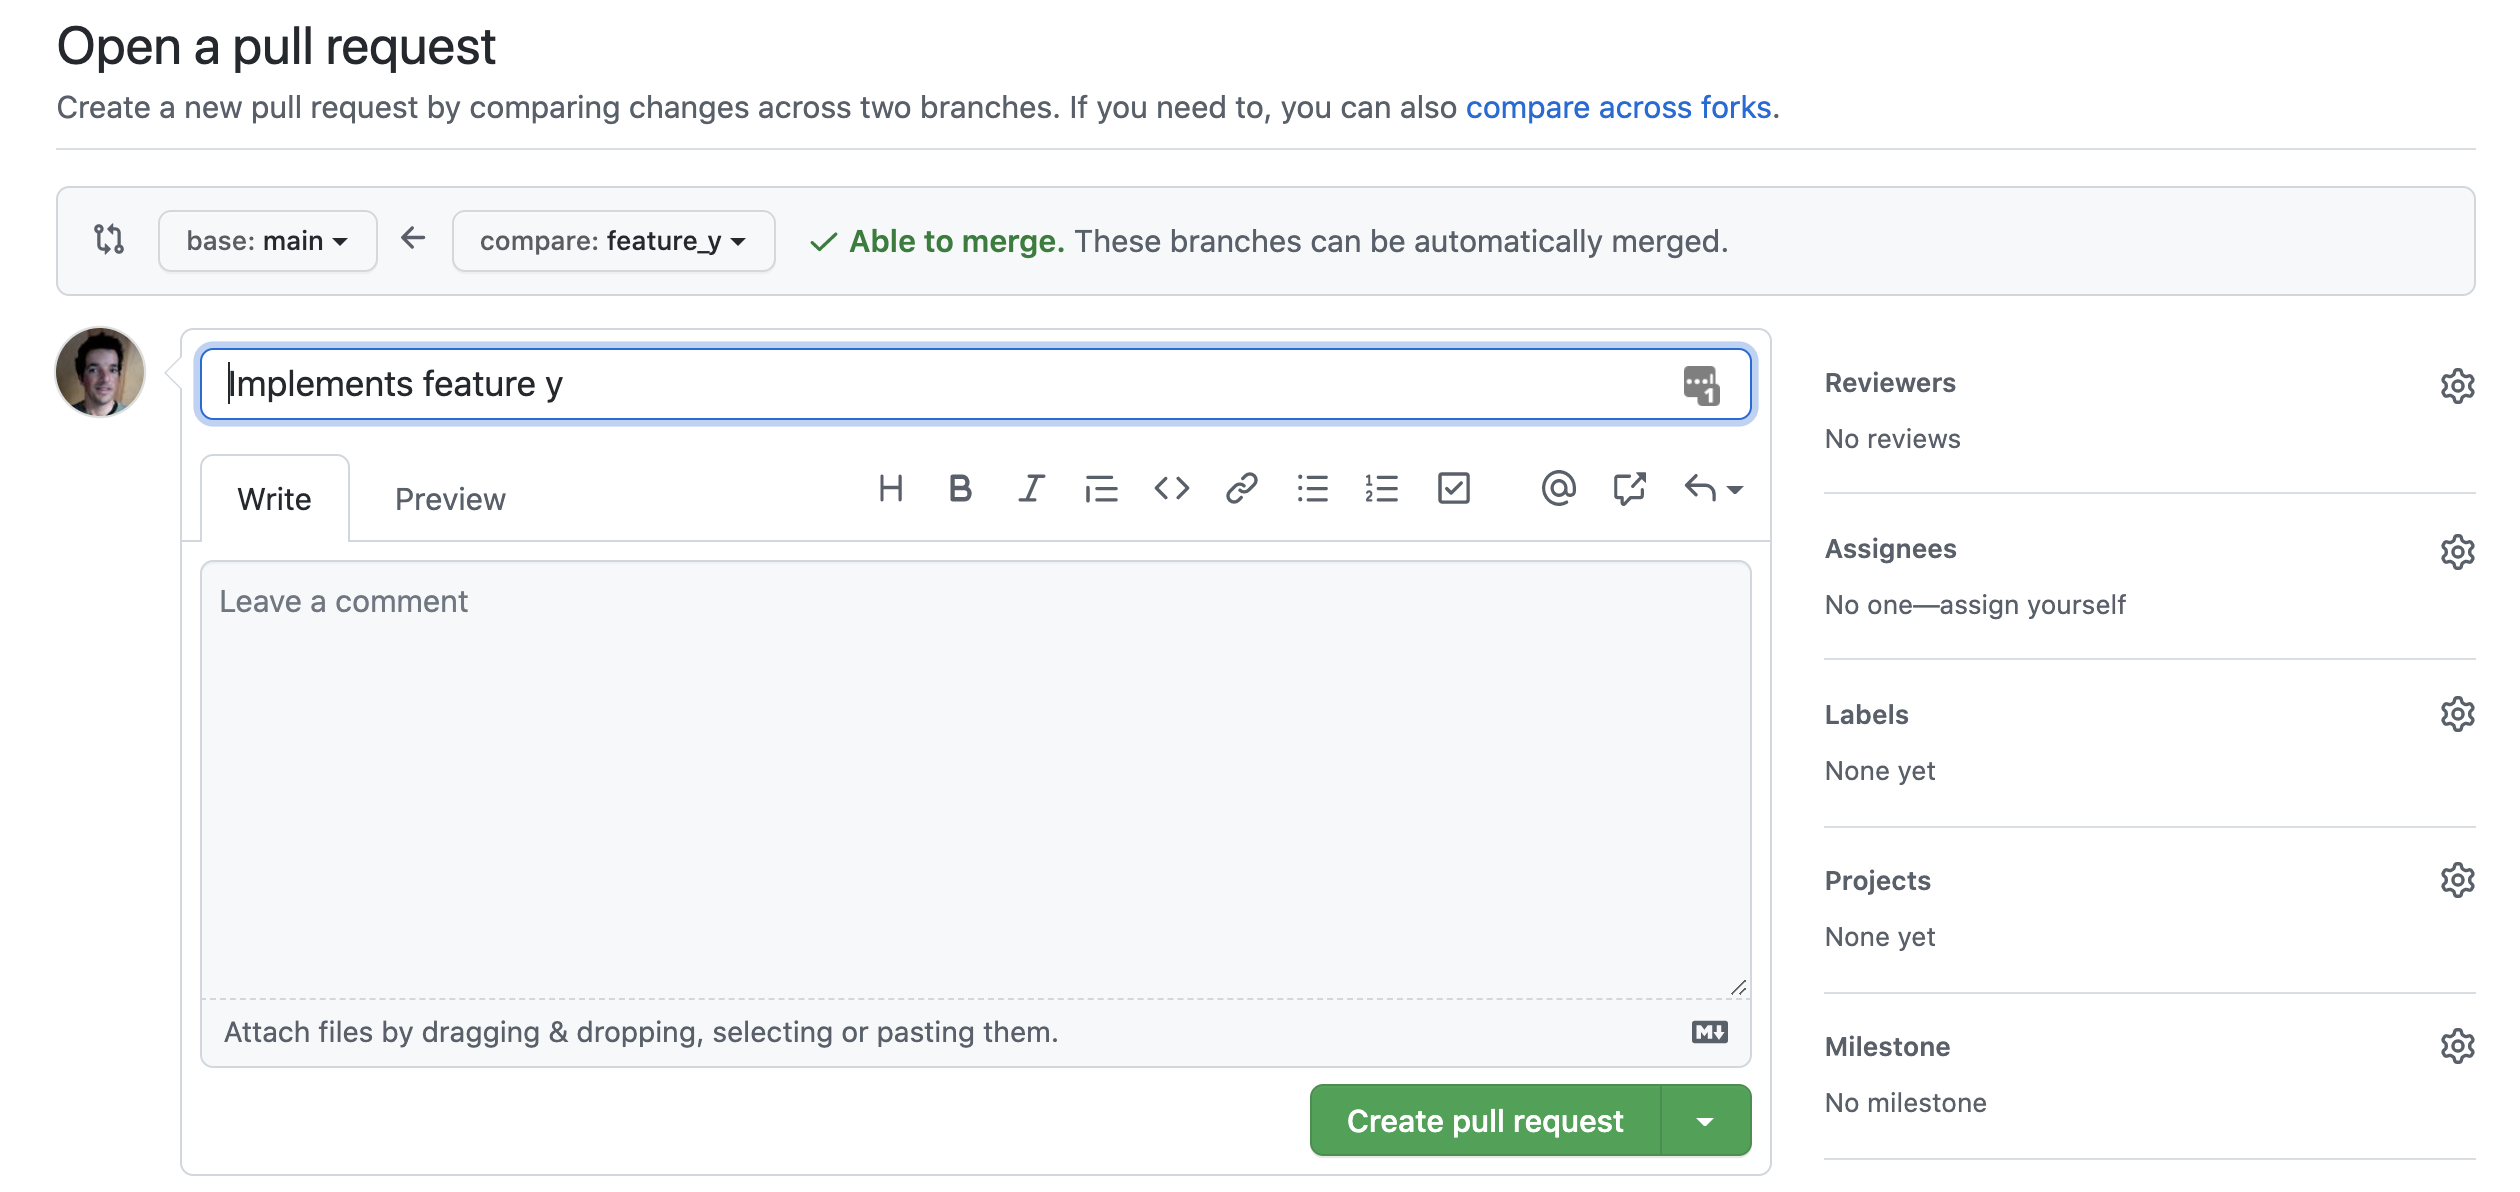
Fig. 3.6 When opening a Pull Request, you can add some information about the proposed changes.
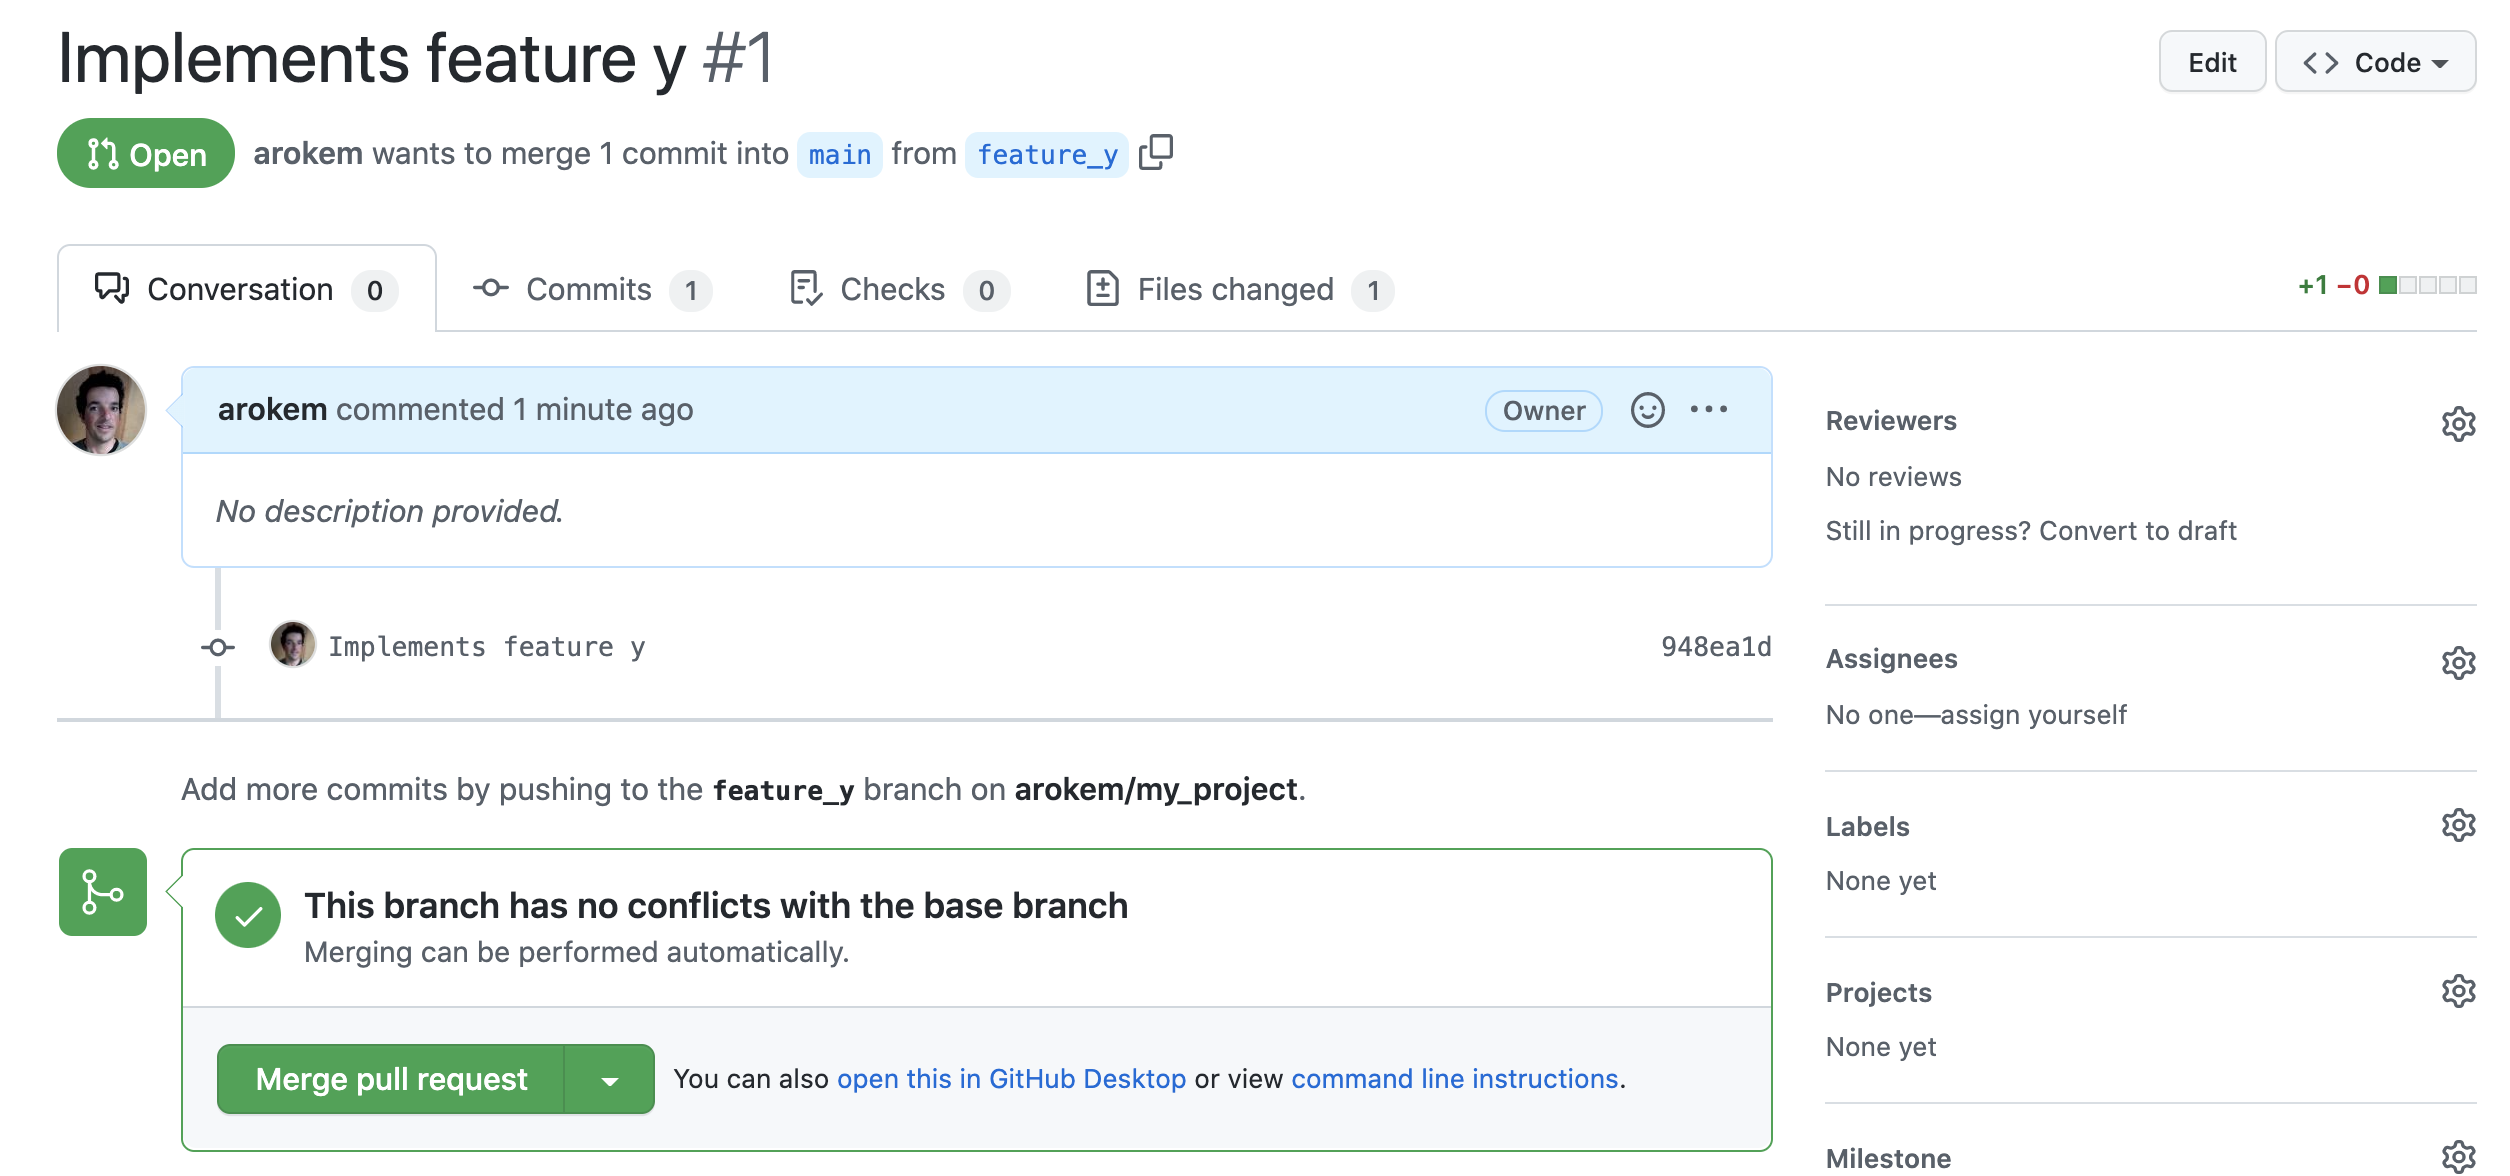
Fig. 3.7 The Pull Request interface is a place to discuss proposed changes and eventually incorporate them into the project, by clicking the green “Merge pull request” button.
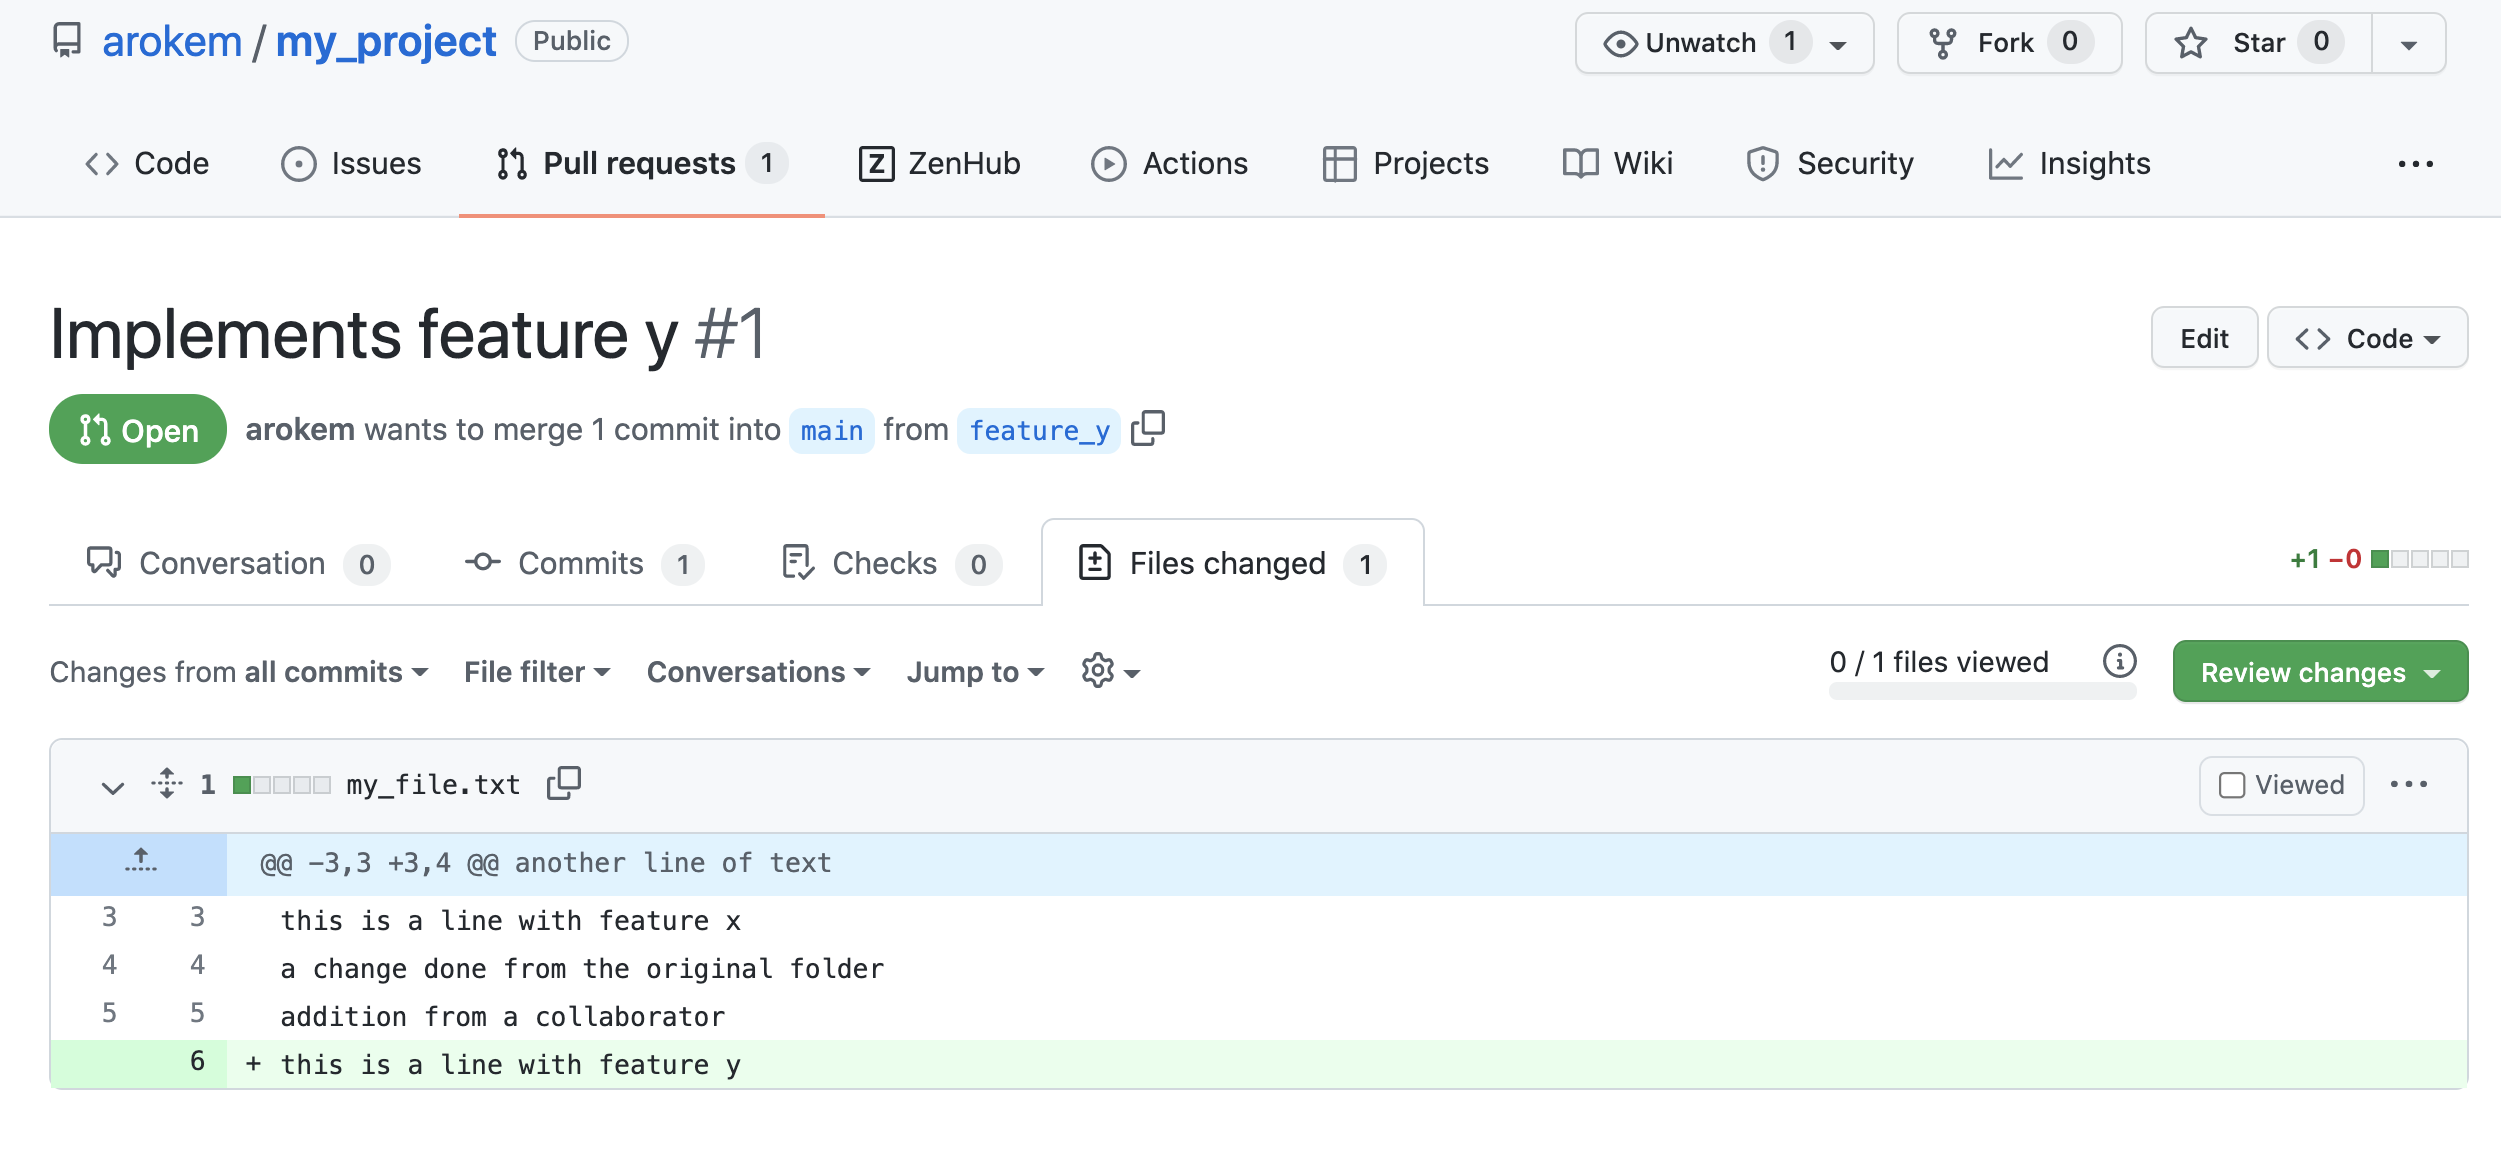
Fig. 3.8 You can view a detailed line-by-line “diff” of the changes in the “Files changed” tab of a Pull Request.
While this model of collaboration might seem a bit odd at first, it has a lot of advantages: individual contributions to the project are divided into branches and pull requests. The pull request interface allows for a detailed line-by-line review of changes to the project and discussion. This is particularly important for projects where changes to complex code are required. In tandem with automated code testing (which we will discuss in Section 6), thorough code review mitigates merging changes to the code that introduce new bugs to the code base. In addition to these advantages, the pull request is retained after the change is merged, as a permanent record of these discussions. This allows all of the collaborators on a project to revisit how decisions were made to introduce particular changes. This is a great way to retain collective memory about the way that a project evolved, even after collaborators on the project graduate and/or move on to do other things.
3.4.1. More complex collaboration patterns
Here, we demonstrated a pattern that works well for a relatively small collaboration, with a few collaborators who all know each other. But, git and GitHub also enable much more complex patterns, that support large and distributed collaborations between people who don’t even know each other but would like to contribute to the same project. These patterns enable the large open-source software projects that we will start discussing in Section 8.
Datalad is version control for data
As you read the section about git you might be wondering whether it is a good idea to also store the data that you are working with within your project git repository. The answer is that your probably shouldn’t. Git was designed to track changes to text-based files, and it would not operate very well if you started adding data files to your repositories. This is particularly true for very large files, like the ones that we routinely deal with in the analysis of neuroimaging data. Fortunately, there is a git-like solution for tracking data. This is an open-source software project called “Datalad”. Similar to git, it operates as a command-line program that can be called with sub-commands to add data to a repository and to track changes to the data. One of the most compelling use-cases for datalad is in tandem with git to track changes to code and the changes to derivatives of the code at the same time. We will not go into depth on how to use datalad here, but to learn more about datalad and to get started using it, you can read an openly available book that introduces datalad and walks you through its usage.
3.5. Additional resources
To learn more about the history and more recent objections to the “master”/”slave” terminology in computer science and engineering, you can refer to [Eglash, 2007].
To explain the use of git and GitHub, we went through a whole sequence of operations using the command line. However, there are several graphical user interfaces (GUIs) for git and GitHub that are worth checking out. First of all, GitHub has a GUI that they developed. In addition, there is an entire page of options to choose from in the git documentation.
To learn about more elaborate collaboration patterns for version control and collaboration, we would recommend studying the git workflow used by the nibabel project. You will learn more about what nibabel does in Section 12, but for now, you can use their documentation to learn more about how you might use git.
- 1
It is theoretically possible to create another change that would have the same commit, but figuring out how to do that would be so computationally demanding that, while theoretically possible, it is not something we need to worry about in any practical sense.